Drawing Reflection

So I am reflecting on drawing class now. I would say that overall the class was pretty boring because a lot was drawing realistically directly from photos, which isn't necessarily bad. It was good that I stretched to depict all different stuff in my pieces from this class. It was just really boring and tedious, especially with some of the Prismacolor ones. The see-through final where I drew all the glass stuff made me want to jump into a ditch and get run over multiple times by rogue go-karts. Out of all three art classes I took this semester I'd say that OVERALL my output from this class would be stuff I am most proud of (excluding that trash first piece with the contour lines, jesus just looking at it makes me depressed). I did get more experienced with Prismacolor which is nice. I think the piece I like the most is the record one. I think you can really see the perspective and the reflection with that one. I was surprised with the scratchboard project - I thought I would dislike it, but I didn't totally hate working with it or the overall results I got with my finished piece. I made a lot of mistakes with the perspective on the ground but it looks decent enough. So tl;dr class was boring but the practice was good.
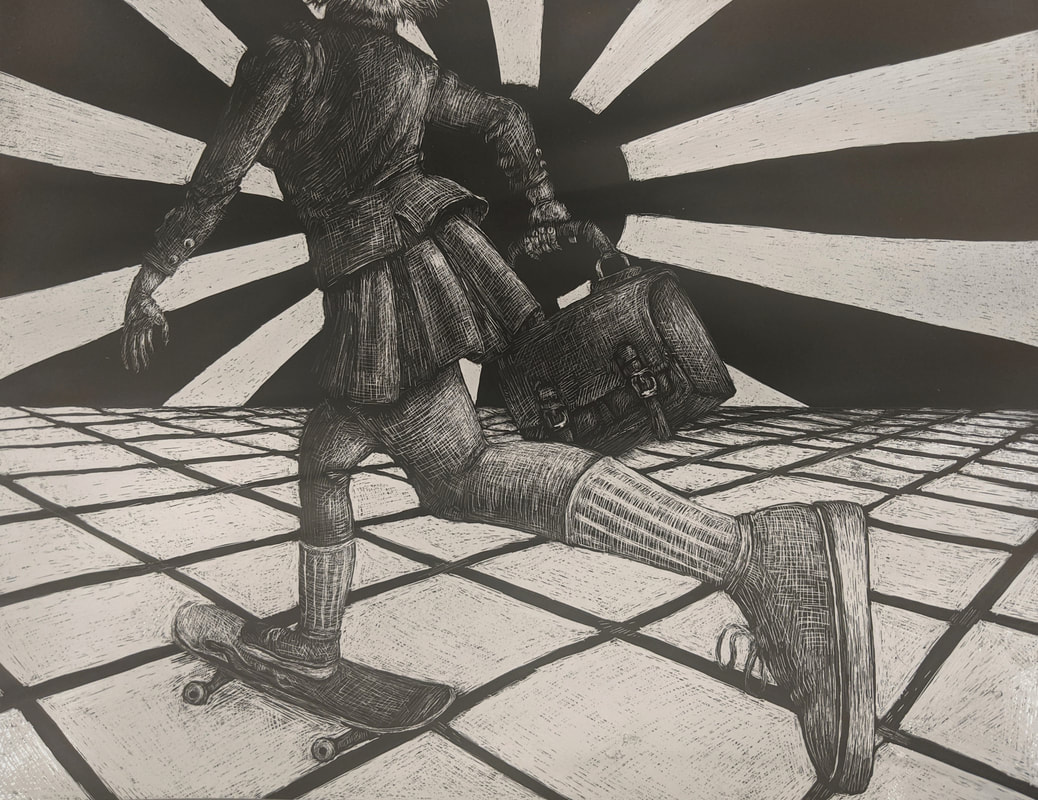
1/16/20 - Scratchboard Project
|
|
Describe the subject matter and meaning of your artwork.
I decided to do a school girl skateboarding. There isn't really any particular meaning to the piece. I guess I was just thinking about skateboarding because I haven't done it in awhile, so I thought that it would be a nice action thing to do. How did you use textures to enhance your picture? I tried to depict the girl's hair and the leather textures on the briefcase. Her skirt and jacket are more smooth but I still showed the folds of those items by showing the light and shadow on them. I also showed the texture of the socks pretty clearly. The textures and extra detail in certain places add interest to the picture and make it more realistic. How did you balance your artwork and create a well-organized composition? I wanted most of the girl's body to be to the left. The shoe/leg is a lot |


|
closer to the camera so it stretches over to the right. I feel like the sun pattern in the back and the squares on the floor balance out the focus you have on the girl pretty well.
How did you imply movement in your drawing? I tried to depict perspective with the girl's leg. As she pushes off the ground, it goes closer to the camera and appears bigger than the rest of her body. I think I got pretty close to the reference photo with the pose. I also made her clothes and hair flowing in the opposite direction of where she is going so it gives the appearance of wind flowing past her, showing her movement. How could you improve your artwork? I think for the most part I am satisfied with how this piece turned out. The biggest improvement on this I could make would be being more careful with the perspective on the square pattern. I had a lot of |
problems with it and you can see some places where I messed up the lines. I could also probably make the girl lighter and add more value differences on the shoe that's closer to the camera.
How did you demonstrate a wide range of shading values?
I made a lot of stuff in the background pure white or as close to pure white as I could make it without losing my marbles. I showed lighter areas like the socks, the skin, and the bottom of the shoes by adding more lines. I tried to emphasize shadows by making some areas completely dark.
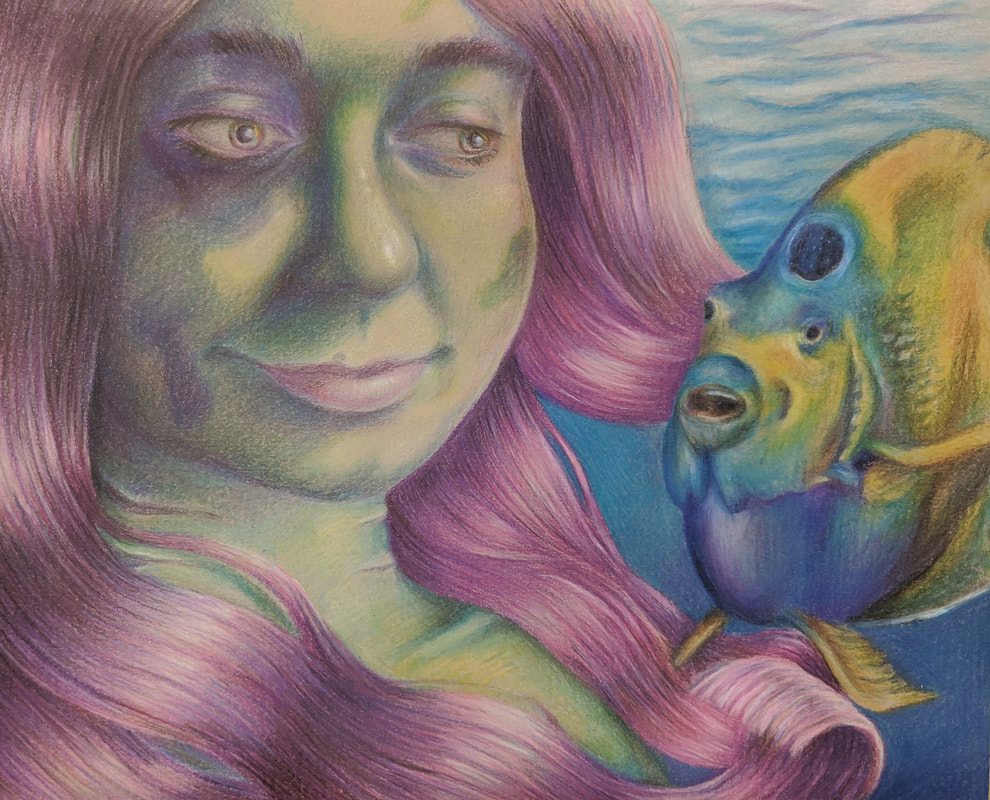
1/9/20 - Self Portrait Project
|
|
1. Explain the process you went through to develop your drawing.
The assignment was to draw a self portrait, but with some kind of twist or variation. I drew sketches of two of the examples given, zombie and normal. The next two I did were of me as a ghost or as a mermaid. I eventually chose to do a mermaid because I felt I could get more color variation in the drawing, and chose to do it with Prismacolor because I could get vibrant colors. 2. Explain how you found the different values in the portrait? I have no idea what this means. Uhh well I used my eyes to locate the shadows and highlights. Then I translated them onto the page in the different colors. 3. Did you achieve a full range of the different values within your portrait? How? I did include lots of different values. I looked at the values in the original picture and recreated them in the skin colors for the mermaid: green, blue, and purple mostly. I experimented with a lot of different colors especially in the hair. To get the deeper tones I basically just layered a bunch of random colors on top of each other which is usually what I do anyways. |


|
4. Describe your craftsmanship. Is the artwork executed and crafted neatly?
In my opinion the final piece is definitely neat and well-executed. I tried to take more care making the lines more well-placed this time. The only thing that wasn't that neat was the lines of the blending pencil that I used but you can't really see it in the final piece unless you look in the right lighting. 5. How were you able to capture your look? I think my angle was a little off from the original photo I used. But the main things of my "look" were probably the eyebrows and eyes. Then the smile and face shape would be the next important. My nose looks janky but it still looks like me so I don't care. 6. Explain how you made sure you had correct facial feature placement. I don't really know. I just eyed the original photo really hard and managed to copy it well enough for the finished piece to be recognizable as me. I didn't really have any specific techniques I used. 7. Explain the importance of learning how to draw all the features individually. |
Learning to draw all the features individually is pretty important because then you will be able to understand the overall structure of the part. Then you can place all of those parts together into a whole face and apply it to your piece.
8. What part of this unit was the most beneficial and why?
I already knew how to use Prismacolor and also had done face practices for AP Art. So none of the practices we did were particularly beneficial to me.
9. List any obstacles you had to overcome and how you dealt with them.
My biggest obstacle was probably getting over the idea of how stupid the idea of me as a mermaid was. I don't know, I just don't like self portraits, and this was no exception. I didn't have any other particular difficulties other than with how long it to to complete.
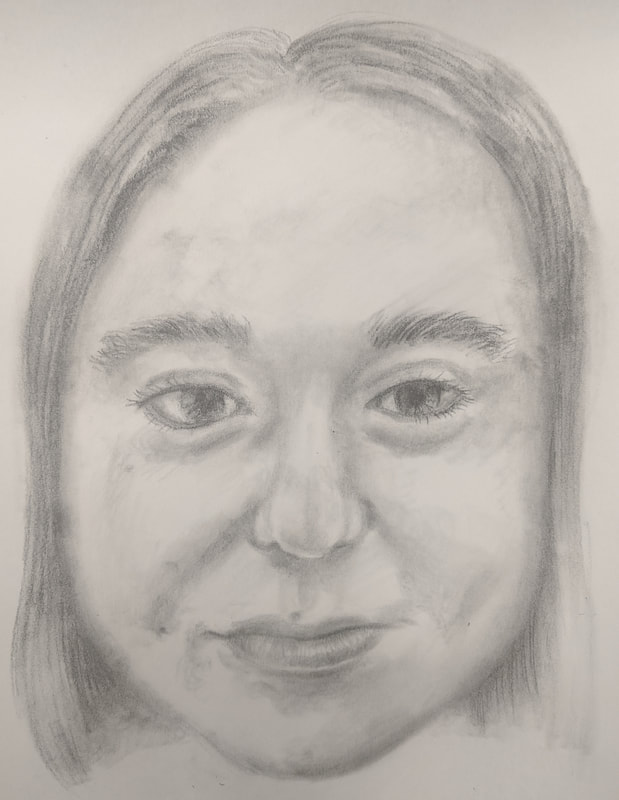
12/6/19 - Face Over Skull
|
For this mini project we had to draw our face over a picture of a skull. That's really it. I had a pretty good time. I think it looks like me so I guess I succeeded. My ears weren't showing in the reference photo I used so that's why you can't see them.
|
12/4/19 - Facial Feature Practice


These were the facial features demo drawings we did. In order, it's the first basic eye, my left eye, my nose, my right eye, and my lips. I used 2B, 4B, and 3H pencils and a blending stump. You said I didn't have to do the video versions since I already did them in AP so it's just my features...
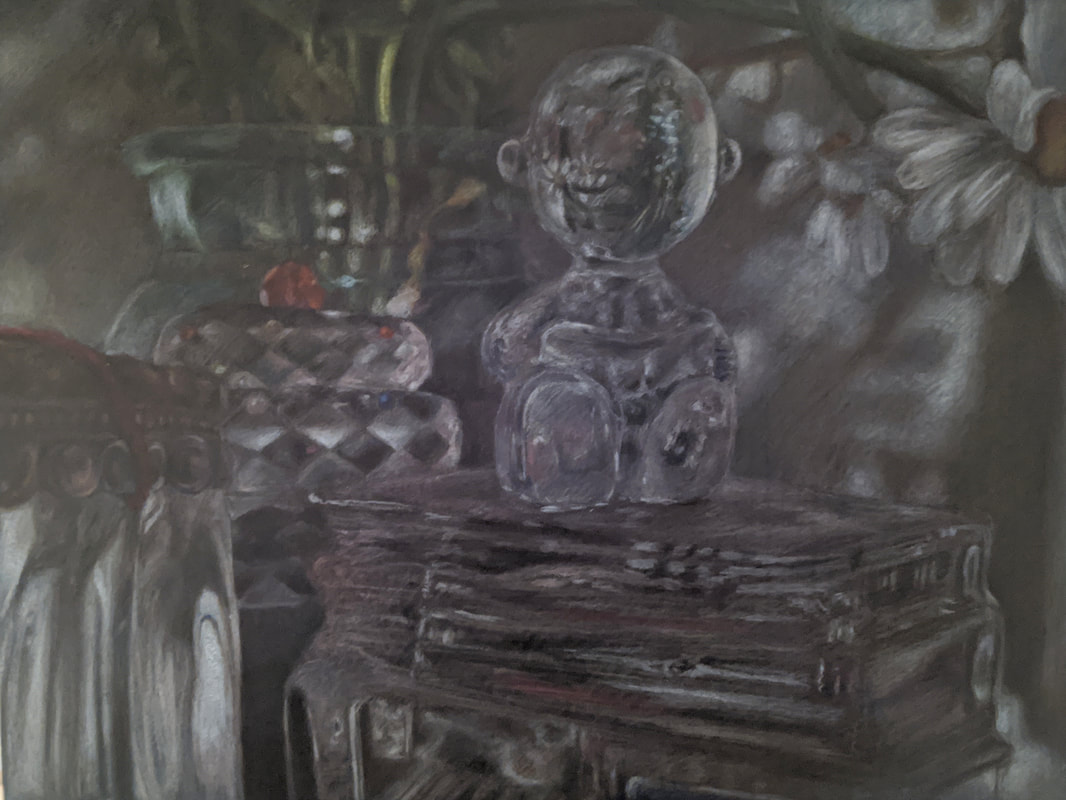
12/3/19 - See-Through Drawing Final
|
|
I used the Opacity questions. They don't really fit exactly but I wasn't sure which one to use.....
Describe the craftsmanship of your drawing. I think the craftsmanship of my drawing is pretty good. I was careful to try and depict all the different details of the glass and flowers. I didn't make a lot of mistakes in this one as opposed to other Prismacolor drawings I've done in the past. I think I rushed the box in the middle foreground a little bit but it doesn't look that bad. Describe how your background choices help unify the three artworks and tie them together as one piece of art. Okay, I have no idea what this means, so I'm just gonna talk about what color paper I used. I used the black paper because there was a lot of white in the drawing so I thought it could look interesting. It was also a challenge, because I kind of hate drawing on black paper because I have trouble getting stuff to show up sometimes and I usually pick the lighter colored paper. So this was a good exercise in trying something new. I think it turned out alright on this color |


|
paper, but I did have trouble getting the whites to be as bright as I wanted. It does look better in person because the lighting in my room (where I took the final photo) is not great.
Describe your choice of colors/color harmonies and how you used them throughout the artwork. A lot of the colors in the reference image were light and warm. This was hard to show on the black paper, which made a lot of colors look darker and cooler. Since most of the colors were white or cream, I guess most of the color scheme would be considered monochromatic, with the plant and the gems being pops of other colors. How did you create contrast in your drawing? With the colors, I tried to emphasize the difference between lights and darks. In some places I really scrubbed with the white and the black pencils to create a noticeable difference. I also created differences between foreground and background by trying to depict the blurred out background forms. |
How did you use textures, highlights and shadows to enhance your artwork?
Highlights were super important because of all the glass figures in my piece. I tried to emphasize these highlights to make them pop more against the black paper. A combination of sepia, violet blue, and black pencils were used for the shadows. Since most of the textures of the objects in the piece were smooth, I tried to make the reflections and highlights fit the shape to give it form and to show where there were indents and carvings.
Why did you choose a particular background color to mount your artwork?
Uhhh no idea what this means either. This could be related to the paper, so I guess see the second question...? Yeah.
Discuss the importance of understanding the media (prisma or pastels) and acquiring the skills necessary to create a successful project.
Prismacolors are important to at least pretend how to understand because they make you look like a legit pro artist. You have to baby them and layer the colors for seven hours so they won't mess up. Doing glass with Prismacolor feels like doing open heart surgery with no hands. It is important that you have some prior knowledge of the medium so that you can make the glass look somewhat realistic. A beginner would probably not succeed doing any kind of reflections with the medium.
Describe any difficulties you had creating your drawing and what you could do to improve your drawing?
Since my reference photo was so complicated, there were a lot of intricate details I had to pay attention to and capture in the drawing. The black paper was also hard to make colors stand out on. If I took more time on the glass box in the foreground it could probably look a bit more polished. Other than that, the process was just really long and boring.
11/30/19 - Candy Practice


These were the practices we did with the different kinds of candy wrappers. I decided to do them in Prismacolor because I hate myself and also because I wanted to get more detail. I didn't finish the first one obviously. Included also is the mint drawing we did with white colored pencil.
10/31/19 - Pastels Practice/Egg Drawings


These are the practices that we did with pastels. I enjoyed working with them even though the were super messy. I did complementary colors and cool colors for my egg pastel drawings. I actually like how both turned out.
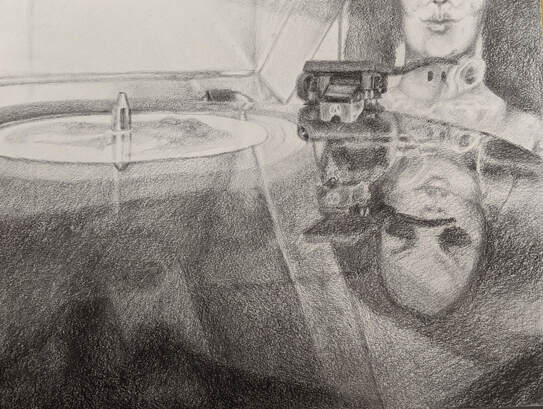
10/28/19 - Look at that View Final
|
|
Describe how you created an interesting point of view? Was it successful? Why or why not?
I feel that my piece was successful in showing an interesting point of view because seeing the perspective from very close to a record is probably not seen very often by people in real life. Interest is also added to the piece from the upwards reflection in the record showing another perspective. Why is it important to understand perspective and how to draw it? Perspective is extremely important to know how to draw because an artist should be able depict interesting positions and viewpoints in their work. Usually things just drawn straight forward with no movement are not as interesting to look at as things from an angle. Drawing things in a different perspective also pushes you to try something new and improve your skills. |


|
How were the colored pencil exercises important in the success of your piece?
The colored pencil exercises were important in practicing to show value and smooth blending in a piece. Overall though, it wasn't as important to me specifically because I decided to do my piece with pencil and charcoal, which I wanted to do because I had already done a Prismacolor piece with a reflection. Describe the craftsmanship of your colored pencil. What techniques were used? (How well the project is technically crafted?) Just gonna pretend that this is asking about my pencil work. First I drew a sketch in really light pencil (like 4H or something) so I could block everything in and get the angle and proportions correct. Then I worked left to right, doing the top sections first. I blocked in the really |
dark parts with charcoal and then colored over them with 6B pencil. Similarly to Prismacolor, a lot of parts I laid down light graphite first before gradually making it darker. I think the craftsmanship is pretty good, I made sure to define certain sections and make other ones blurrier. I wouldn't say there are a lot of noticeable mistakes.
Were you able to achieve depth by showing a foreground, middle ground and back- ground? Explain.
I think I definitely achieved depth with this piece. The record player cover and the vinyl cover are in the background and are a lot lighter than the record in the foreground. The middle ground consists of the middle of the record and the needle (don't really know the technical terms and too lazy to look them up, but you know what I mean). You can clearly see the record coming towards the camera.
Explain your experience with colored pencil and the project in general. What were the obstacles and advantages?
Pretending this is asking about pencil.... I wanted to do it in pencil and charcoal because I have had pretty good experiences with them in the past. I knew I could get good value transitions working with the two together. The project was pretty boring after awhile but I didn't have any specific bad experience. One big obstacle was the smudging that you get a lot with charcoal and graphite and I had to strategize where I would continue work so I didn't smudge anything. I think I did better with that than the last project. The advantage with this was that I had worked in this medium a lot before so I had some experience.
Looking back on the progression of this project what skills, techniques or other information would you like to have been taught? Do you feel you were prepared for this project?
I think I was taught all the skills necessary for this project. I think if I work with pencil or charcoal in the future I would want to try using a blending stump so I can get more smooth transitions, versus just using the pencils and nothing else. I was prepared for this project.
10/11/19 - Prismacolor Practice


|
|
These are the Prismacolor practices we did in preparation for our upcoming project. The sphere and cone drawings were done on light, medium, and dark colored paper. Probably the most difficult part of that was drawing the sphere. The cone wasn't that hard and went pretty fast. The fruit or vegetable drawing took awhile but I'm pretty satisfied with how it turned out. My last one was a tomato on black paper, so I wanted to try light paper this time. The most difficult part was probably trying to recreate the vein-y texture on the pit of the avocado, but it looks decent.
|
10/6/19 - Perspective Practice


These are all the perspective practice that we did based on the videos. My favorite one of these is probably the 3D city. The room is pretty ace too. Otherwise they made me wish I chose a different career path. Probably the most challenging part of these is how stale it is. It's just ruler work, much like my love life.
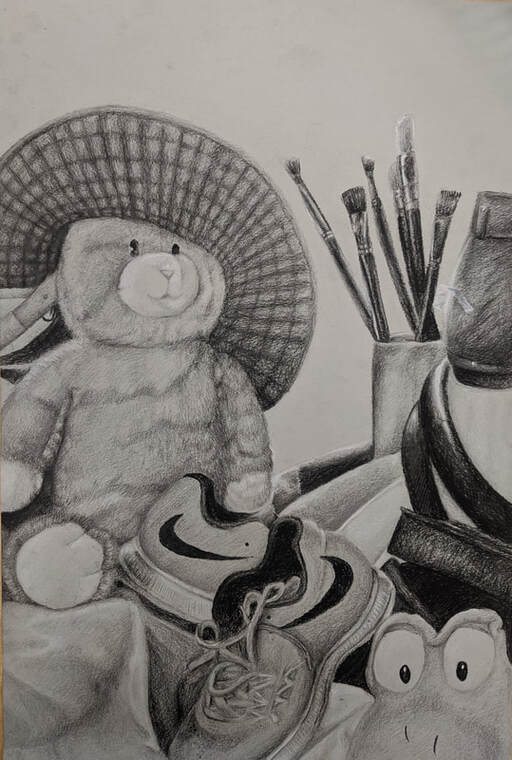
9/30/19 - Still Life
|
|
Describe the craftsmanship of your drawing. (Is it clear, clean edges, blended well, smudges, defined space, etc.)
I believe that the drawing has good craftsmanship. You can clearly see the edges and where things end and begin. There are a few smudges at the top that I tried to erase but I couldn't. I don't think they're too noticeable though. Are your values and shadows realistic? How many values did you include? How and why are values important? I feel as though the values and shadows are pretty realistic. I wanted to include dark values because before I had difficulty adding them in. In the dark valued areas, like the hat, the shoe decals, and the paintbrushes, I made heavy use of the charcoal pencil. I also used white Prismacolor pencils to highlight certain areas. Values are important because they create contrast and help the eye to differentiate between different subjects in the drawing. |


|
Is there a clear source of lighting?
The source is not super clear but you can see that the lighting is coming from above the subject due to the highlights on the top of many objects. How important were the compositional sketches? Explain. The compositional sketches were pretty important. They helped me to see the same still life from different angles and to figure out what organization I liked in a quick way. How is your final drawing successful? My final drawing is successful because it uses value and contrast in an effective way. The composition is also pretty balanced. I think the drawing depicts the subject in a way that is interesting to the eye. Are the proportions, structure and perspective of the subject correct? I believe the proportions are correct. I did have trouble with the hat, so the structure on that might be a little bit off if you compare it to the original reference photo. I think the perspective is correct because it's just pretty much head on. Does the placement & grouping of objects create a pleasing arrangement (composition)? I think the arrangement of the objects in the piece creates a good composition. The paintbrushes, shoe, and other various objects on the right are balanced with the cart on the left. The shoes in the middle are probably the anchor of the piece. I think there is enough variation to make it interesting. Is there a center of interest and is it well located? The center of interest would probably be the cat stuffed animal. I would guess that because that's just where my eye goes first. It's probably well located. I'd say that because the shapes lead your eye to the bottom and through the center up through the paintbrushes again. |
How well did you manage your time and resources throughout the process of creating this drawing? Do you see where you could improve in this area?
My time and resources were managed pretty well. I was able to finish it in class. I probably spent the most time on the laces on the sneakers, because they were pretty light and there was a lot of tiny details required. I also spent a lot of time on the hat. I did rush a little bit on the shoe on the right so I think I could improve on that.
What challenges did you encounter during this project and how did you overcome them?
I had to figure out how what order to color everything in so that I didn't smudge it. I also had difficulty putting down the charcoal at first - I thought it was too dark and kinda regretted it. But then I realized that I actually really liked the difference in values, I just had to figure out how to balance that with the other values in the drawing.
What have you learned drawing a still life?
I learned to look carefully at the proportions of individual shapes so that I could draw them realistically. I also had to compare the values of certain objects to others so that I could portray them in greyscale accurately.
9/18/19 - White Value Charts, Ribbon, and Fabric Shading


These were a series of different shading assignments we had. The first being the white pencil/charcoal/chalk on black paper, making value charts and drawing the paper ribbon. The next three were different sections of fabric that we drew from life. The first is pencil on white paper, the second is charcoal on grey paper, and the third is white prismacolor on black paper. I probably had the most fun with the white on black paper ones. The charcoal one isn't as smooth as I would've wanted.
9/13/19 - Value and Shape Shading
|
|
This is the first work with shading that we did. It was definitely easier than contour line drawing for me. For the first drawing, we did a value chart and practiced shading different shapes. The next drawing we drew the individual shapes in front of us. The final drawing we had to arrange the shapes and draw them all together. I'm pretty satisfied with the work I did but if I had more time and wasn't working on my colored pencil reflection that is taking 873824873 years I would add more contrast to certain shapes. I actually like the still life arrangement that i drew and I think it's pretty true to life.
|
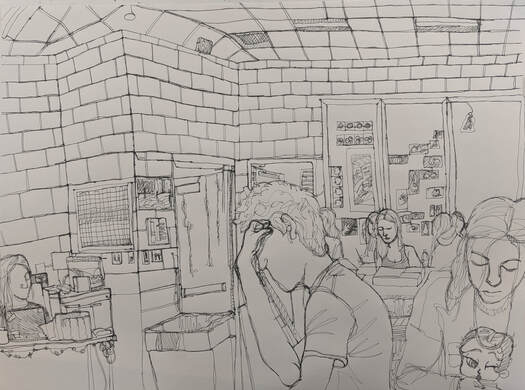
9/10/19 - Contour Room Drawing
|
SELF EVALUATION (Practice drawing used as final)
Did you use a fluid line? Explain how this is evident. I did use a fluid line. You can see the fluidity of all the lines especially when you look at the select shading, folds in clothes, depiction of the people in the classroom, and artwork on the wall. The lines are not just separate strokes, it is one line that curves in different ways to show the room. Explain how your knowledge and creating practice studies with contour line contributed to the success of your piece. The practice studies of the hands, shoe, and backpack helped me to see lines and textures in different objects and depict those subjects with fluid lines that accurately showed what I was seeing. |
Describe the difference in your contour line drawing to an outline drawing.
An outline drawing would only show the outline of an object. A contour line drawing means that all of the details must be drawn with one fluid line, not just the silhouette or outside features.
Explain how your interpretation of line is essential in capturing the look of the room.
Since everything must be drawn in one fluid line, the drawn line might not be totally accurate to real life. How you interpret the lines you see in front of you and choose to depict them in your contour line drawing is important. You have to look for the most important lines and use those to imply texture or pattern in a whole subject, so that you can faithfully portray all the different objects in the room.
What did you learn from completing this drawing? If you could recreate your piece, what would you do differently to enhance the outcome?
I learned to take more time and not rush a line. I also learned to look for details in objects and how to stylize and depict those objects accurately with the contour line method. If I could recreate the piece I would do a lot of things differently. I messed up the ceiling so I would redo it but slower this time. Also the kid in front of me moved before I could finish drawing him so it looks really weird. The scale in some areas is off as well. Overall I would try to rush less and think more about the lines I was putting down.
9/3/19 - Shoe and Backpack Contour Drawings
|
|
These are the contour line drawings I did for the shoe and the backpack. The shoe was extremely difficult but I figured I should probably challenge myself with something that involved a lot more lines. The practice one is pretty bad but even though I did mess up a few times on the final drawing, I think it's a lot better. I drew my own backpack and it was hard but I think I was able to make it pretty accurately sized and proportioned, for the most part. The lettering on the pins was definitely the hardest part.
|
8/28/19 - Hand Contour Drawings
|
|
These were the contour drawings I did of my hands in different positions. The first three were done without looking at the paper. I think they became relatively decent and more matched to the actual size of my hand over time. The next three were done with the ability to look at the paper while I drew. I'm pretty pleased with how they turned out, especially the third one, which I think is pretty accurate in size and proportions to my real hand.
|
8/27/19 - Tree in Landscape, Animal, Street Scene, Hand
|
|
For the first assignment we drew a tree in a landscape, an animal, a street scene with one point perspective, and our hand. The hand was probably the easiest because I had it to reference but the tree in a landscape looks pretty good too in my opinion. I didn't reference anything for the cat so it ended up looking like an extra from the Cats trailer.
|
